
Hello there, I know many of you have seen me posting pictures of my FujiFilm Instax SHARE Printer on my Instagram so often. I am totally smitten with this baby the moment my brother got it for me. And I even brought it with me during my Japan trip in April.
I have also crochet 2 instagram-inspired cosy for my Instax printer to prevent it from being scratched. If you are interested in getting one for your printer, kindly drop me an email here: shop.happiescrappie@gmail.com

Here's the list of my must-haves in my handbag when I was travelling in Tokyo:
1. iPhone - not pictured here as I was using it to take this photo
2. Instagram pouch - gifted from my girllie and I use it to store my knick knacks
3. Instax SHARE SP-1 printer and Instax Mini films
4. Power Bank
5. My beloved camera >> Olympus OMD-EM5 - I have never own any DSLR in my live but I do have 2 four-thirds cameras.
6. My mini travelogue - that I stitched the cover my the Moleskin Cahier. You can see the full blog post here.
p.s.: I got the Mickey hand camera strap from Tokyo Disney and it is just tooooooooo cute that I had to get one for my brother too!

Peeking into my mini travelogue - Started this mini to journal the itinerary and highlights of the trip - what we saw, what we dis, and where we went. I also have dedicated a section to jot down what I have bought - from where and also the prices. Plus this mini notebook has a mini envelope at the back where you could slot your receipts or business cards. Love Love Love.
Since I have journal down the highlights of the trip in my travelogue, I can always refer to this whenever I work on my mini album for my Japan trip in the future.

I have read some of the reviews saying the users always end up with over exposed photos when printing from Instax SHARE printer. I wasted about a box of my instax film to experiment with the brightness, contrast and colour to find out how to do it perfectly. Well, at least I think after I edited the photo and print them out, they look perfect to me!
Ok, let's me show you how I edit my photos using PicTapGo app on my iPhone. You can definitely use other photo editing software on your phone, but I love PicTapGo because it allows users to adjust the level of editing. PicTapGo is a Paid app which can be purchased at USD1.99. For free app, you could use Snapseed which also allow you to adjust the level of editing according to your preference.
Both apps do wonderful job in editing photos and I normally just bump up the brightness and crop the photo before I post on Instagram or Facebook. I normally stick to PicTapGo nowadays because - ever since Snapseed updated their app, they always pull out photos from the VERY FIRST photo in my camera roll. Definitely NOT FUN (sorry for the caps here!) when I gotta scroll through a few thousand of photos to look for the most recent photos that I have taken and wanted to edit. I always have at least 5000 to 7000 photos on my iPhone =P Other than this, SnapSeed is a wonderful app that I used a lot before I decided to invest my USD1.99 in PicTapGo ;)
I am using a cheesy photo of me and my hubster during our Japan trip. Bear with me ;P So this is how the photo look like, without editing, when I take photo in a well-lit place. Tips 101: always try to take photo in a well-lit place especially you are using front camera which has lower resolution.

Then now I open the photo in PicTapGo app. As you could see in the screenshot, II always use these 5 filters only - Crispity, Brightside, Warm It Up, Lights On & Cool It Down. All you need to do it swipe your finger the adjust the intensity of each filter according to your preference.

Here's the side-by-side comparison of the no filter photo and edited photo:

1. Without Editing : No Filter. I don't normally print out my non-edited photo on my Canon Pixma or Instax SHARE.
2. To Print on Instax SHARE >> Use Filters: Crispity & Lights Out. I like to bring down the brightness (using Lights out) and increase the saturation of the photo (using Crispity) before I print on Instax SHARE. This is because I always end up with over-exposed / washed / pale photo when I print unedited photos. So I came up with this solution.
3. To post on Instagram or other social media / printing on my Canon Pixma >> Use Filters: Crispity & Lights On / Brightside. I also use Warm It Up / Cool It Down to adjust the white balance of the photo and I *think* i always edit my photo to be a little warmer (yellowish).
I know the middle photo looks awful here (or even on my iPhone screen) but you will see why later. And now proceed to printing!
You would need your phone, Instax SHARE and a pack of film (duh!!!)
Don't forget to download the free app (Instax SHARE) for printing your photos wifi here(iPhone or Android). And more instructions to print the photo can be find here too.
Don't forget to download the free app (Instax SHARE) for printing your photos wifi here(iPhone or Android). And more instructions to print the photo can be find here too.
Load your pack of film by following instructions.


Connect to Instax SHARE printer Wi-Fi. For my iPhone 5, I go to Settings >> Wi-Fi >> and select the printer (if you turn on your printer, it should be listed on you Wi-Fi settings)
Go to your Instax SHARE app >> Choose from Photos >> Select Photo >> Connect and Print.
You can also edit your photo before printing in the app itself - mainly rotating or resizing or add basic filter the photo before printing it out.
And then let the printing begin!


And here's the comparison of the photo that I have printed out. The one of the left have been edited with filter (lights out, increase crispity) and the right was totally no filter. I personally prefer the one on the left because the colour is richer and doesn't look over-exposed.

So now, your turn to try printing from your Instax SHARE! Happy printing!
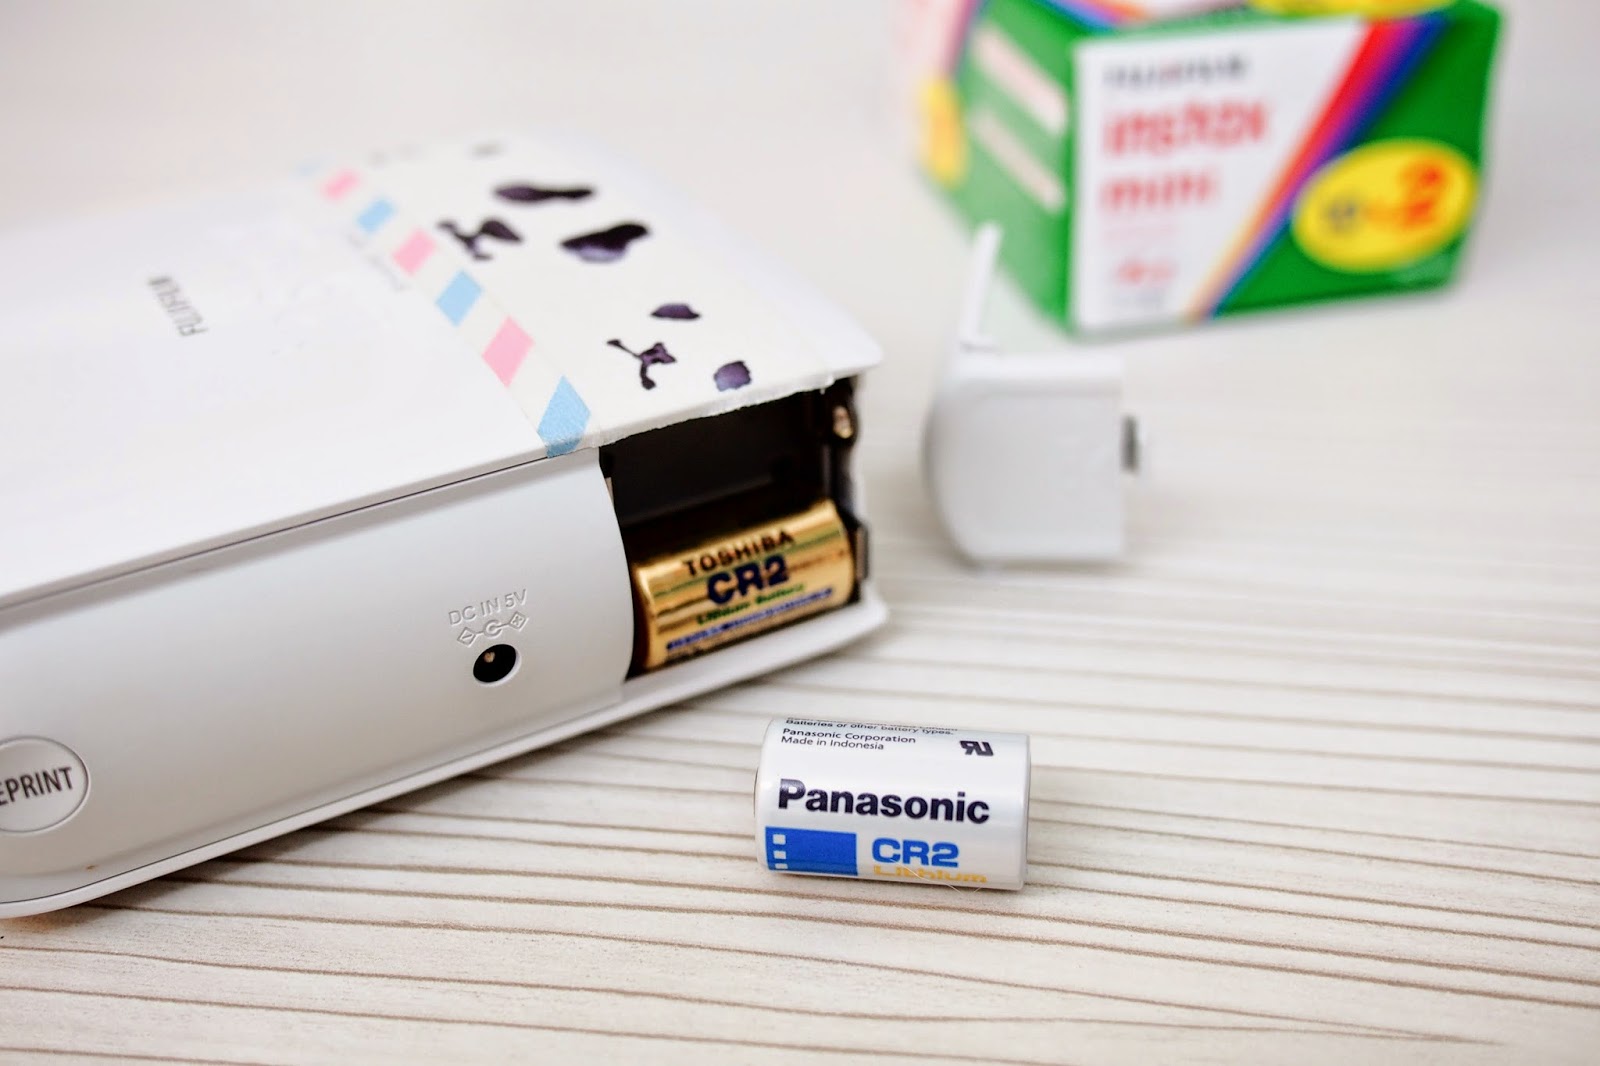
Oh ya, I would like to share how fast my battery actually died on me when I was using it during my Japan trip. The printer actually uses 2 pieces of odd-sized batteries - CR2. It is very difficult to get it at where I am located. I got extra batteries from BIC Camera while I was in Tokyo at USD5 each, still it is not cheap. And I paid USD7-8 for the batteries if I were to get it in Malaysia.
I managed to print 3 packs of films (total 30 photos) throughout my trip. I have friends told me the battery lasted her more than 30 prints, but well, i guess it depends on how you used it too. I only print 2~3 photos at once and I think the switching on and off my printer part made the batteries die even faster.
So my solution? I got an USB cable (at USD3.80) to connect to my portable power bank (which I have 3!!) and also a set of rechargeable batteries for CR2 (at USD11.50). I got these from an Online Store named Passion Gadgets which is based in Singapore. I am sure you could get them from Ebay too

I hope you enjoy my step-by-step of printing from my FujiFilm Instax SHARE printer using my iPhone. Have a great weekend!
XoXo,

How can adjust a picture to fit entirely into the instax printer app,I have had this issue with a couple of photos know they are too square and I simply want to reduce them in order to fit the print.Thank you for your help.Kisses
ReplyDeleteI supposed you need to crop the photos first?
DeleteInstax will cut both side of the original photos. So after you chose a picture, go to Edit > Edit the picture. You can move the photos to either side to make sure it crops as you want it.
DeleteHi any idea why the location is not appearing when using the real time template?
ReplyDeleteI liked the way you put together everything, there is certainly no need to go any further to look for any additional information. You mentioned each and everything that too with much of ease.Thanks for sharing such nice post....
ReplyDeleteIndian Stock Market Tips
I have also crochet 2 instagram-inspired cosy for my Instax printer to prevent it from being ... einstaxmini.blogspot.de
ReplyDeleteHello there, I know many of you have seen me posting pictures of my FujiFilm Instax SHARE Printer on my Instagram so often. I am totally ... instaxprinter.blogspot.com
ReplyDeleteGreat post! My bff let me borrow the instax camera but I really want to get the one you have. What type of power bank do you have I need to get that too.
ReplyDeleteI am very impress with your updated blog. I enjoyed every little bit part of it. thnks a lot . GET Share Market live
ReplyDeleteasiaprint.com.sg, a leading offset printer in Singapore, has established itself as a major player in the printing industry in Malaysia and Singapore with its distinct vision and clear approach to help small to medium businesses grow. It serves thousands of on-demand business printing orders online daily. Our rapid growing business has developed a highly motivated and professional team which can offer 24-7 non-stop production operations. We use high-quality press printing machines and a robust yet simple and easy-to-use Online printer Singapore. We provide high-end printing services and reliable color printing at discount printing costs.
ReplyDeleteI wonder why other professionals don’t notice your website much m glad I found this. quality club flyer
ReplyDeleteHI, Thanks for the tutorial on Instax Camera for the instax pictures.
ReplyDeleteindicant flyers or handbills are also azygous sheets printed on a forceful comparable that of a brochure. Printing VIP
ReplyDeleteNice blog. Thanks for sharing useful infomation.
ReplyDeletePrinting Malaysia
ReplyDeleteNice blog. Thanks for sharing useful information.
Online printing
Nice blog. Thanks for useful information. Printing Malaysia
ReplyDeleteNice blog.Thanks for the tutorial Print Malaysia
ReplyDeleteThank you so much for sharing such a wonderful blog. A picture can say thousand words. Pictures are memories and we can make photo album to remind that moment. Photography is nicely done. Something Unique. Thank you once again.
ReplyDeleteHi, I was wondering could anyone explain to me how to make my photos fix into the Instax Share format. I had to redownload my pictures to my phone and my photos are too large. That's what the thing says in red on my app. Can someone help me to make my photos fit? I can't even shrink the photos only enlarge it.
ReplyDeleteNice, thanks for sharing useful information
ReplyDeletedigital printing
The blog was absolutely fantastic! Lot of information is helpful in some or the other way. Keep updating the blog, looking forward for more content...Great job, keep it up.
ReplyDeleteFlyers Printing Malaysia
Nice blog. Impressive. Keep update information.
ReplyDeleteFlyers printing Malaysia
nice blog.thankful for sharing your information.keep update information
ReplyDeleteOnline Printing Malaysia
Nice blog very useful. Thanks for sharing that look awesome.
ReplyDeletePrinting Malaysia
The blog was absolutely fantastic! Lot of information is helpful in some or the other way. Keep updating the blog, looking forward for more content...Great job, keep it up.
ReplyDeleteFlyers Printing Malaysia
ReplyDeleteNice blog. very much impressed and thanks for sharing
Printing Malaysia
ReplyDeleteNice blog. very much impressed and thanks for sharing
Printing Malaysia
ReplyDeleteImpressed alot.I really like your blog.
Thanks for the post
print Malaysia
Good blog! You have described in a nice way.
ReplyDeleteThanks for sharing this information.
Booklet printing Malaysia
Good blog! You have described in a nice way.
ReplyDeleteThanks for sharing this information.
Booklet printing Malaysia
Good blog! You have described in a nice way.
ReplyDeleteThanks for sharing this information.
print malaysia
It offers cheap printing services
ReplyDeletebao bì màng Metalize
In phông bì tại Hà Nội
Nice Blog, very use full
ReplyDeleteThank for sharing
Print Malaysia
ReplyDeletepackaging design - plastic bag - nylon bag - plastic bag - plastic bag - bag - plastic bag - plastic bag - plastic bag - bag - bag.
In hộp đựng Giày
In hộp đựng rượu
Cung cấp quà tặng
Công ty chuyên in bao bì
Công ty chuyên in bao bì
Nice Blog, very use full
ReplyDeleteThank for sharing
Print Malaysia
Good blog! You have described in a nice way.
ReplyDeleteThanks for sharing this information.
digitalprintingservices
Nice Blog, very use full
ReplyDeleteThank for sharing
Print Malaysia
Impressive! I really like this blog.
ReplyDeleteThanks for sharing this information…
Print malaysia
ReplyDeleteIn áo 3d tại Hà Nội
Địa chỉ in túi giấy chuyên nghiệp
bao bì màng Metalize
xưởng in hà nội
in ấn tại bắc ninh
in offset hà nội
in bao bi gia re tai hai duong
Your post is really impressive and so helpful. I was confused about putting filter to the photos I want to print using instax papers and your post gives so many information. Thank you so much, keep posting good stuffs. Cheers :)
ReplyDeleteGood Blog, very use full
ReplyDeleteThank for sharing
printing Malaysia
Thank for sharing
ReplyDeletePrinting Malaysia
I found your this post while searching for information about blog-related research ... It's a good post .. keep posting and updating information.
ReplyDeletecoil printing
Hi any idea why the location is not appearing when using the real time template?
ReplyDeletepersonalised baby canvas
baby girl decorative pillow
baby pillow lounger
Thanks for sharing this blog with us because it is really informative. If you're searching for a fuji xerox printer or copier for your business to purchase, lease and rent. Obtain a copier machine from CPC Solution, a reputable supplier in Singapore. Reliable, cost-effective, and high-performing copiers and printers are what we offer.
ReplyDeleteThank you for sharing this useful information with us. Come to CPC Solution if you're looking to buy fuji xerox copier in Singapore. We are top-rated copier rental companies in Singapore. We offer wide range copier machine, that comes with lots of features and capabilities, including high-speed printing, scanning, and copying, advanced security features, and user-friendly interfaces. For more details, kindly contact us now!!
ReplyDelete